Percolation Lab
Simulating percolation through a
Porous Material
Getting Started
Overview
The Percolation program simulates a substance percolating through a
porous material, such as water or gas percolating through the
ground. The simulation shows percolation through a vertical
two-dimensional slice through the material, represented by a bounded
grid. At the beginning of the simulation, cells within the grid
represent solid material or empty porous openings.
A percolating substance is added to the porous material; as the
simultion runs, the percolating substance spreads to other empty
cells.
Through a graphical user interface, the user can control how the
simulation program is run, stepping through it one step at a time
or running it for many steps until the Stop button is pressed.
In each step, the percolating substance seeps a little further if
it can, moving one cell at a time in one or more directions.
Through the exercises in this project, you will be creating a class to
represent solid material, and creating another class to represent a
simple vertical percolator (a substance that sinks, or percolates
down, but does not seep sideways nor percolate up).
In a follow-up to this lab, you will create a class that can seep
sideways or down, but still obeys gravity and does not percolate up.
Classes
You will be using several classes provided for you, shown in the
diagram below, as well as creating new classes of your own.
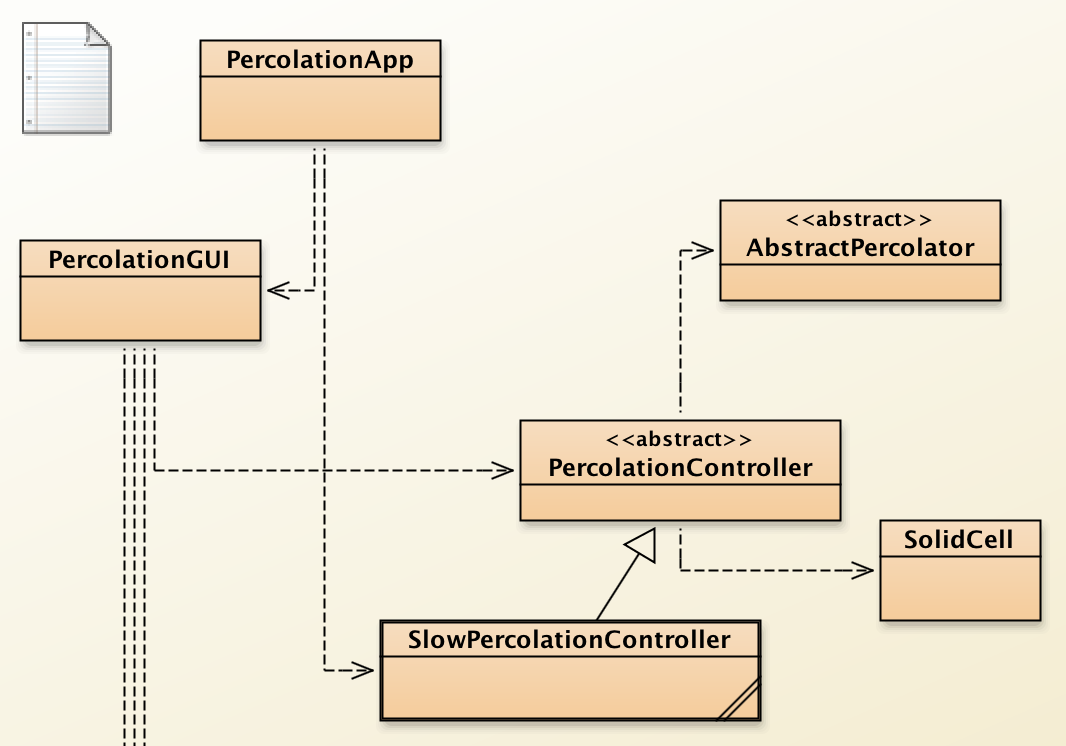
PercolationApp represents the application as a whole, and
contains the main method.
(You will make several small modifications to this method in the
course of the lab, although most of your focus will be on creating
new classes.)
- An object of the
PercolationGUI class provides a
graphical user interface, allowing the user to create a simulated
material, specify how porous it should be, add a percolating
substance to it, and run the simulation.
- The code that actually controls the simulation, in reaction to user actions
through the graphical user interface, is found in the
PercolationController class and its
SlowPercolationController subclass.
- The vertical slice of the porous material is represented by a
Grid.
The Grid class comes from the GridPkg library, so
you won't see it in your project or BlueJ class diagram.
- Objects in a grid must be
GridObject objects, so the
classes you create will be subclasses of the GridObject
class. This class also comes from the GridPkg library, and so
does not appear in your project or BlueJ class diagram.
Throughout this lab you may want to have access to the
class documentation for the Grid, GridObject,
and Location classes. This documentation can be found at
www.cs.kzoo.edu/GridPkg/GridPkgClassDocumentation/.
- One
GridObject subclass is already provided for you:
SolidCell. These objects
represent solid matter in the porous material.
For convenience,
this class actually inherits from the ColorBlock
class used by GridPlotter (which, in turn, inherits from
GridObject).
- For now, ignore the
AbstractPercolator class; you
will use it in a later mini-lab.
- The graphical user interface also uses objects of several other classes
not shown in the diagram above,
including a
PercolationDataFileHandler that allows the
user to read sample configurations for porous materials from files, or
save a configuration to a file.
Exercise 1 — Downloading and compiling a skeleton
version of the program:
- Download the zip file
(
PercolationCode.zip)
for the Percolation Project code, and unzip it.
The starting code files described above will be in the unzipped
PercolationCode folder.
-
Also download
grid.jar,
the Java archive library for the Grid Package, containing classes
such as
Grid, GridObject, and ColorBlock,
upon which the Percolation Program is built.
Put the grid.jar file in a new
+libs folder under the PercolationCode
folder (recommended for BlueJ) or in the
PercolationCode folder itself.
You will have to make sure your project knows about the
grid.jar
library. In BlueJ, you can create
a +libs folder under the PercolationCode
folder and put the jar
file there, or you can specify its location in the Libraries tab of
the Preferences or Properties dialog box (under
BlueJ->Preferences, Tools->Preferences
or File->Properties, depending on the version of BlueJ you are
using).
- Download and unzip the
PercolationDataFiles.zip
file containing various data files you can
use to populate the grid. These will be useful later.
- Within BlueJ, open the
PercolationCode folder as
a Non-BlueJ Project and compile it.
|
Becoming Familiar with the Program and User Interface
In the next exercise you will run the Percolation program and become
familiar with the functionality of its graphical user interface.
Exercise 2 — Understanding the SolidCell
Class:
-
Look over the
SolidCell class, whose objects
represent solid matter in the porous
material. Every class that represents objects in a grid must
inherit from the GridObject class, but in this
case it does so indirectly: the SolidCell
class extends the ColorBlock class,
which extends GridObject.
    java.lang.object
      |
      +--edu.kzoo.grid.GridObject
            |
            +--edu.kzoo.grid.ColorBlock
                  |
                  +--SolidCell
-
Notice that the new
SolidCell
class does not need any new instance variables, since it
inherits all the state it needs from ColorBlock
and GridObject.
SolidCell has two different
constructors: one which takes no parameters, and one which takes one
parameter, a color. Since a ColorBlock
expects to be told the color of the block, the constructor
with no parameters will always create itself as a black block.
-
Finally, the
SolidCell redefines the
act method from GridObject. The
inherited method does absolutely nothing, but the redefined
version prints out a debugging message if debugging is turned on.
Analysis Questions: (write these up to turn in at the end of
lab)
- Which superclass constructor is being invoked by the two
calls to
super in the SolidCell
constructors?
- Where does the
location
method being called in act come from? Who is the
"Hey, you!" object receiving that method?
(Hint: look at the class documentation for the
ColorBlock and GridObject
classes.)
Class documentation for all classes in the Grid Package can be found
here.
|
Exercise 3 — Becoming familiar with the program:
Compile and run your skeletal percolation program. You
can't run a simulation with anything
actually percolating yet, because you don't have
any percolating substances, but you should be able to create a
representation of a porous material.
Buttons:
- Create a new grid using the appropriate button in the
graphical user interface.
- Using the Manually Populate Grid button, add a few solid
cells to
your grid.
- How many types are available to you in the Type
pull-down menu?
- What happens when you click on an empty cell in the
grid? What happens when you click on a grid location
with a SolidCell in it?
- What happens when you click the Done button?
- What happens if you click on Manually Populate Grid
when the grid already has some items in it?
- Click on the Step Once button, the Step N Times button,
and the Run button. What happens? What did you expect to
happen? Why?
Note: when you click on the Step Once
button, the graphical user interface
calls the step method in the
program's controller object
(SlowPercolationController), which calls the
act method for all the cells in the grid.
What does the SolidCell act
method do?
- What happens when you click on the Automatically
Populate Grid button? What is the effect of choosing a
density of 0%, 5%, 30%, 75%, or 100%?
- What happens when you click on Manually Populate Grid after
having automatically populated the grid? Why might this be
useful?
File Menu:
- Create a new grid using the File menu, not the New Grid
button. Edit the grid, again using the File menu, and add
some solid cells to your grid. Is the behavior any
different from using the buttons?
- Open the grid file called
porousMaterialA.dat. (It should be in the
PercolationDataFiles folder you downloaded and
unzipped earlier.)
- Edit the grid you opened to place a solid cell that
cuts off one of the pathways from the top of the grid to the
bottom.
- Save your new, edited grid as
porousMaterialA2.dat in the
PercolationDataFiles folder.
- Test that you saved the file correctly by creating a new
grid (to overwrite the current one) and then opening your
saved file.
- Open the other data files provided to you to see how
they differ.
You do not need to formally write up and turn in the answers to
the questions in this exercise, but if there are any you do not
understand or to which you are unsure of the answers, you should
be sure to follow up with the lab instructor or teaching
assistant.
|
Using Images
You have been representing your solid cells using a solid block of
color, which was possible because you extended the
ColorBlock class. Grid package applications also provide a
relatively easy way to associate a picture with a class, so that every
object of the class in a grid is represented by the same picture.
Exercise 4 — Using images to represent solid cells:
- Download and unzip the
PercolationImages.zip
file.
- Edit the
PercolationApp class and find the
commented-out code that associates the
SolidCell class with marb1.gif
(the statement spans across two lines). Uncomment these
lines, modify the reference to ../images/marb1.gif
to be ../PercolationImages/marb1.gif,
then run the program creating solid cells in a grid.
- If you want, you can change the code to use any of the
files in the
PercolationImages folder
for your solid cells.
Alternative: You can also get a Grid Package program to
use an image for objects of a class by placing an image with
the same name as the class in the same directory as the
BlueJ package file. For example, you could copy the
marb1.gif file to the same directory as the
class and change its name to SolidCell.gif.
|
Debugging
Often when you write a program, it is useful to keep track of some
information as you go. You can do this by printing that information.
On the other hand, once you know you have your program working you will
not want extraneous messages coming out when you run it. The Grid
Package Debug class provides a handy way to put print
statements in your code that will only print out only when you want them
to, usually during debugging.
Exercise 5 — Debugging:
-
You already discovered in Exercise 3 that solid cells
don't do anything when you click on the Step Once
button, even though their
act method is being
called each time.
- Edit the
PercolationApp class and find the
commented-out code that turns debugging on. Uncomment it
and run your program. Do you see different behavior?
- Before running the program again, click in the BlueJ
terminal window and then choose
Clear from the
Options menu. (Or you can choose Clear
screen at method call in the Options
menu, in which case it will clear away the old results every
time you run the program.)
|
Vertical Percolation
Now it's time to create a class to represent a substance that will
percolate through your porous material. We will start by simulating
"vertical percolation," where the percolating substance percolates straight
down but does not seep sideways nor up. This type of percolation might
describe the behavior of a small solid, such as grains of sand,
percolating through a material, although it would not provide a good
simulation of a liquid or gas.
Exercise 6 — Creating a skeletal vertical
percolation class:
-
Create a new class called
VerticalPercolator.
Eventually this will represent a substance that percolates
down through your porous material, although to start with we
will create a class that doesn't do anything yet. That means
that to begin with it will be very similar to the
SolidCell class.
(You may want to copy and paste some code segments from
SolidCell into VerticalPercolator as
you go.)
This class, though,
should inherit directly from the GridObject class
(not from the ColorBlock class).
    java.lang.object
      |
      +--edu.kzoo.grid.GridObject
            |
            +--VerticalPercolator
- Run your program, creating (or reading in) a grid with
solid cells in it.
Can you create vertical percolation objects in the grid?
(Are there any other types in the pull-down menu to the left
of the editing grid?)
- In the
PercolationApp class, uncomment the
line that would add "VerticalPercolator" to the array of
editableTypes.
(Notice that one difference between arrays and ArrayLists is that
arrays provide this short-hand method that you see for adding
elements to the array.)
Don't uncomment the line that would add "VerticalPercolator" to the array of percTypes. You will make use of the PercTypes array for the programming project.
- Run your program, creating (or reading in) a grid with
solid cells and adding vertical percolation objects to it.
What do vertical percolation objects look like?
- In the
PercolationApp class, uncomment the
two lines that will associate the
VerticalPercolation class with an image. (You
can switch to a different image if you like.)
- Run your program again, creating (or reading in) a grid
with solid cells and vertical percolation objects in it.
Click on the Step Once button. Do you see different
behavior (or at least different debugging output) for solid
cells and vertical percolators?
Is the behavior what you expected to see?
- Between each run of your program, don't forget to
click in the BlueJ
terminal window and then choose
Clear from the
Options menu.
- Save a grid with some solid cells and some
vertical percolation objects in it to a file. Read in the
file. What was saved to the file?
Is the behavior what you expected to see?
|
Exercise 7 — Next steps
toward percolation:
|
Exercise 8 — Fully implemented
vertical percolation:
-
Update the getPercolationLocation method to
return the correct location.
There are at least 2 ways you could choose to do this.
You could first determine the row and
column of the substance's current location, and then use those
values to return a new location that represents the location
below the current location. OR
You could ask the grid to get the location below the substance's
current location using getNeighbor and
Direction.SOUTH.
(Class documentation for all classes in the Grid Package can be
found
here.
Note that there is also a getDirection method that
could be useful in other situations.)
Run your program and make sure
that your debugging messages show that you've calculated the
right location.
-
Update the
percolateTo method. The first thing
it needs to do is to see whether the location passed to it as
a parameter is a valid location (inside the grid, not outside)
and is empty. Read the class documentation for the
Grid
class to find out what methods would be useful for this.
Pay particular attention to the method details, including
the description of the return values. You will find that
one of the two obvious method choices can be used to check
for both validity and emptyness. If the location you are
trying to percolate to is invalid or not empty, just return
without doing anything. If it is OK, then percolate there by
adding a new VerticalPercolator object to the
grid in the new location. The last thing you need to do is to
tell the current controller about the new object you created.
You can do this with code like the following (assuming that
dupl is a variable representing the new object):
PercolationController.getController().notePercolationTo(dupl);
Thus, the skeleton
for this method, with comments, debugging messages,
and the statement to notify the controller of the new object,
might look like:
     Debug.println("Should now percolate to location " + newLoc);

     // If newLoc is not in the grid or is not empty, do nothing.

     // If newLoc is a valid, empty location, spread to that location.
     Debug.println("Should percolate to location " + newLoc +
                   " successfully.");

     // Tell the controller about the new percolating substance object.
     PercolationController.getController().notePercolationTo(dupl);
- Before you run your program, think clearly about what you
expect the results to be. Then run the program and compare
your actual results to your expected results. Edit your
program as necessary so that your program does what you expect
it to. Test your program with a variety of different grids,
strategically
placing your solid cells and starting vertical percolation
substances to fully test your program.
|
Exercise 9 — Save and Submit Your Modifications
-
Update the class documentation for
SolidCell and
VerticalPercolator to accurately describe the
purpose and behavior of the class from a user's perspective.
Focus on what the program does, rather then how it does it.
Include your name and the current date as well as the names of
anyone from whom you received help. Update the documentation
before each method, including @return and @parameter
descriptions.
- When you are done and your program works correctly,
submit the source code for the
SolidCell and
VerticalPercolator.
- Also submit your answers to the Analysis Questions in
this lab.
- This lab must be finished before the next class
period.
|