Creating and Extending Grid Package Classes
This document explains how to create
and extend existing classes in the Grid Package. It is
recommended that you read the general overview document, Using
the Grid Package before reading this
document.
You may also wish to read Understanding the Display Component Classes if
you plan to implement your own display classes.
Sections:
A GridObject is the basis for any object that
can be placed in the
Grid. A diagram of the structure of the GridObject
hierarchy can
be found in the Components
for modeling objects in a grid section of
Using the Grid Package.
The standard
GridObject has very little internal
information and
may be of limited use. It contains only the location of the
object.
The three subclasses of GridObject provided with the
package, TextCell
ColorBlock, and
PictureBlock, have some
additional functionality. If further functionality is desired
it is
very simple to subclass GridObject. It is
important to
remember
that a new GridObject subclass is not needed just to
change
the image that
is displayed in the grid, because that information is handled by the
DisplayMap and the display classes as described in the two
previous documents.
If you were want to run a model of people you could simply use a
GridObject and associate an image of a generic person for
the
display, however
this would not be very useful for an interesting simulation. It
would
make more sense to subclass GridObject to create a Person.
The
Person
class could then keep track of properties such as age, name, etc.
The following code is the partial implementation of a simple person
object:
// Class: Person /** Construcs a new Person object } Code
Sample 1 |
Person extends GridObject and provides three additional instance variables: age, name, and bodyColor. The two constructors allow for you to create a person with a default color or a custom color. Additional constructors that allow the setting of age and name could easily be created as well. For the purpose of this document the
bodyColor
will be the
most important aspect of the Person.The source code for the Person class can be found here: Person.java
Additional, more complicated, examples are the
GridFish,
SlowFish, and
DarterFish classes which
are implementations of the corresponding classes from the AP®
Marine Biology Simulation (MBS) case study.
The
source for the fish and three running simulations are located here: GridFish.java,
SlowFish.java,
DarterFish.java,
MBS.java,
SimpleMBSDemo1.java,
SimpleMBSDemo2.java.Creating New Display Classes
An explanation of how the display component classes work is provided in Understanding the Display Component Classes. This section will provide a walk through of how to write your own display classes.Having just created a working Person class it seems logical that we would want to create a custom display class for it. It would be possible to use one of the pre-exisisting display classes such as
ScaledImageDisplay, but that
would not allow us to take advantage ot the bodyColor of the Person. The following is the entire implementation of the new PersonDisplay class. It is helpfull to see it in its full form before breaking it down step by step.
// // Author: Joel Booth // based on the PatientDisplay class written by Alyce Brady // // // Created on 9 November 2004 // // License Information: // This class is free software; you can redistribute it and/or modify // it under the terms of the GNU General Public License as published by // the Free Software Foundation. // // This class is distributed in the hope that it will be useful, // but WITHOUT ANY WARRANTY; without even the implied warranty of // MERCHANTABILITY or FITNESS FOR A PARTICULAR PURPOSE. See the // GNU General Public License for more details. import java.awt.Color; import java.awt.Component; import java.awt.Graphics2D; import java.awt.Shape; import java.awt.geom.Ellipse2D; import java.awt.geom.Line2D; import edu.kzoo.grid.GridObject; import edu.kzoo.grid.display.ScaledDisplay; /** * @author Joel Booth * @version 9 November 2004 **/ public class PersonDisplay extends ScaledDisplay { private static final double HEAD_DIAMETER = .20; private Shape head; private Shape body; private Shape arms; private Shape leftLeg; private Shape rightLeg; /** Constructs an object that knows how to draw a patient. **/ public PersonDisplay() { buildPaths(HEAD_DIAMETER); } /** Sets up the paths used for the patient body, head, arms, and legs. * The various parameters should be specified assuming the patient * will occupy a cell of size (1, 1). * @param headDiameter circumference of the head **/ protected void buildPaths(double headDiameter) { // Build a set of paths for a patient standing in a unit-length cell. // We will scale as needed later. // The head is a circle (ellipse, actually) of the given diameter. head = new Ellipse2D.Double(-headDiameter/2, -3 * headDiameter/2, headDiameter, headDiameter); // The patient body starts below the head. double bodyLength = 3 * headDiameter; double combinedArmLength = 2 * bodyLength / 3; body = new Line2D.Double(0, -bodyLength/6, 0, bodyLength/6); arms = new Line2D.Double(-combinedArmLength/2, 0, combinedArmLength/2, 0); leftLeg = new Line2D.Double(0, bodyLength/6, -bodyLength/4, bodyLength/2); rightLeg = new Line2D.Double(0, bodyLength/6, bodyLength/4, bodyLength/2); } /** Draws the given object as a stick figure; the object must be of * the Patient class. * (Precondition: <code>obj</code> is a <code>Patient</code> object.) * @param p patient we want to draw * @param comp component on which to draw * @param g2 drawing surface **/ public void draw(GridObject p, Component comp, Graphics2D g2) { Person person = (Person) p; // Set the color based on the person's body color Color color = person.getBodyColor(); g2.setPaint(color); // Draw head g2.draw(head); g2.fill(head); // Stroke stick figure in slightly darker color. g2.setPaint(color.darker()); g2.draw(body); g2.draw(arms); g2.draw(leftLeg); g2.draw(rightLeg); } } |
PersonDisplay extends ScaledDisplay. This allows the display to scale automatically to fit any size cell. It also removes the need for the user to worry about implementing their own scaling algorithm.
The class is divided into 3 methods: PersonDisplay() - the constructor, buildPaths(), and draw().
The constructor simply calls buildPaths(), which takes a single parameter: the diameter of the head. buildPaths() is the method that sets up how the Person will be drawn. HEAD_DIAMETER is a private static final double instance variable.
|
/** Constructs an object that knows how to draw a patient.
**/ public PersonDisplay() { buildPaths(HEAD_DIAMETER); } |
All of the drawing is done with the standard Java 2D libraries. This example will only use some of the most basic features available in those libraries. For the Person we are going to want a head, body, arms, and legs. In order to implement those we are going to create a number of instance variables, all of which are Shapes.
|
...
import java.awt.Shape; private Shape head; private Shape body; private Shape arms; private Shape leftLeg; private Shape rightLeg; ... Code
Sample 4 |
buildPaths() will create these shapes:
|
/** Sets up the paths used for the patient body, head, arms, and legs.
* The various parameters should be specified assuming the patient * will occupy a cell of size (1, 1). * @param headDiameter circumference of the head **/ protected void buildPaths(double headDiameter) { // Build a set of paths for a patient standing in a unit-length cell. // We will scale as needed later. // The head is a circle (ellipse, actually) of the given diameter. head = new Ellipse2D.Double(-headDiameter/2, -3 * headDiameter/2, headDiameter, headDiameter); // The patient body starts below the head. double bodyLength = 3 * headDiameter; double combinedArmLength = 2 * bodyLength / 3; body = new Line2D.Double(0, -bodyLength/6, 0, bodyLength/6); arms = new Line2D.Double(-combinedArmLength/2, 0, combinedArmLength/2, 0); leftLeg = new Line2D.Double(0, bodyLength/6, -bodyLength/4, bodyLength/2); rightLeg = new Line2D.Double(0, bodyLength/6, bodyLength/4, bodyLength/2); } |
It is assumed that the entire object will be drawn inside a cell of size 1x1. It is important to note that the drawing is centered around the (x,y) coordinate of (0,0), which is the center of the cell. The object will be scaled automatically when it is drawn because it is a subclass of ScaledDisplay. buildPaths() bases the size of the shapes in the person on the diameter of the head. Each of the components of the body is a simple Java 2D Shape. The head is an Ellipse2D, the arms, leftLeg, RightLeg,and body are Line2Ds.
Now that the components of the Person have been defined it is time to actually draw them using the draw() method:
|
/** Draws the given object as a stick figure; the object must be of * the Patient class. * (Precondition: <code>obj</code> is a <code>Patient</code> object.) * @param p patient we want to draw * @param comp component on which to draw * @param g2 drawing surface **/ public void draw(GridObject p, Component comp, Graphics2D g2) { Person person = (Person) p; // Set the color based on the person's body color Color color = person.getBodyColor(); g2.setPaint(color); // Draw head g2.draw(head); g2.fill(head); // Stroke stick figure in slightly darker color. g2.setPaint(color.darker()); g2.draw(body); g2.draw(arms); g2.draw(leftLeg); g2.draw(rightLeg); } |
draw() takes three parameters: the GridObject, the Component on which to draw, and the Graphics2D dawing surface. These are the same parameters that all display classes use. The reasoning for this is explained in Understanding the Display Component Classes.
In the case of PersonDisplay we are able to use some interesting tricks to make the diplay more interesting. Because we are only going to be using PersonDisplay for Person objects we are able to use the bodyColor property of the Person. We cast the GridObject that was passed to draw() into a Person. We then create a new Color object and instantiate it to the bodyColor of the person using the getBodyColor() method. Then we set the paint color of the Graphics 2D object (g2) to the new Color object. Now our Person can be painted in their bodyColor.
The next step is drawing the head. We simply use the draw() method of g2 to draw the head, and then call fill() to fill the head (which is an ellipse) in with the color.
In order to make the Person look a little more intersting we change the paint color to a shade slightly darker before drawing the remaining components of the person's body.
That is all that it takes to create a new display class. More intersting classes could be made simply by modifying or adding new shapes to PersonDisplay. The source for
PersonDisplay can be found here: PersonDisplay.javaPutting them Together
Now that we have a new GridObject and a new display class we can see the results of our labor. The easiest way to test out the new classes is to make a simple grid to display them in. The following is a simple PersonTest class:|
// Class:
PersonTest
// // Author: Joel Booth // // License Information: // This class is free software; you can redistribute it and/or modify // it under the terms of the GNU General Public License as published by // the Free Software Foundation. // // This class is distributed in the hope that it will be useful, // but WITHOUT ANY WARRANTY; without even the implied warranty of // MERCHANTABILITY or FITNESS FOR A PARTICULAR PURPOSE. See the // GNU General Public License for more details. import java.awt.Color; import edu.kzoo.grid.ColorBlock; import edu.kzoo.grid.BoundedGrid; import edu.kzoo.grid.Grid; import edu.kzoo.grid.Location; import edu.kzoo.grid.TextCell; import edu.kzoo.grid.display.DisplayMap; import edu.kzoo.grid.gui.GridAppFrame; import edu.kzoo.util.NamedColor; /** * @author Joel Booth * @version 9 November 2004 **/ public class PersonTest { /** * Start the Test program. * The String arguments (args) are not used in this application. **/ public static void main(String[] args) { String TITLE = "Person Test"; Color BACKGROUND_COLOR = Color.WHITE; int MAX_WIDTH = 500; // in pixels int MAX_HEIGHT = 500; // in pixels int MIN_CELL_SIZE = 50; // in pixels // Construct a window to display a grid. GridAppFrame gui = new GridAppFrame(); gui.constructWindowContents(TITLE, BACKGROUND_COLOR, MAX_WIDTH, MAX_HEIGHT, MIN_CELL_SIZE); // Specify how to display color blocks. DisplayMap.associate("Person", new PersonDisplay()); // Construct a grid in which to draw. Grid grid = new BoundedGrid(10, 10); gui.setGrid(grid); // Add 3 people to the grid grid.add(new Person(), new Location(2, 2)); grid.add(new Person(NamedColor.MIDNIGHT), new Location(3, 5)); grid.add(new Person(NamedColor.MAGENTA), new Location(7, 7)); // Display the grid. gui.showGrid(); } } Code
Sample 7 |
This simply creates a 10x10 grid and adds three different Person objects to the grid. The following is the result:
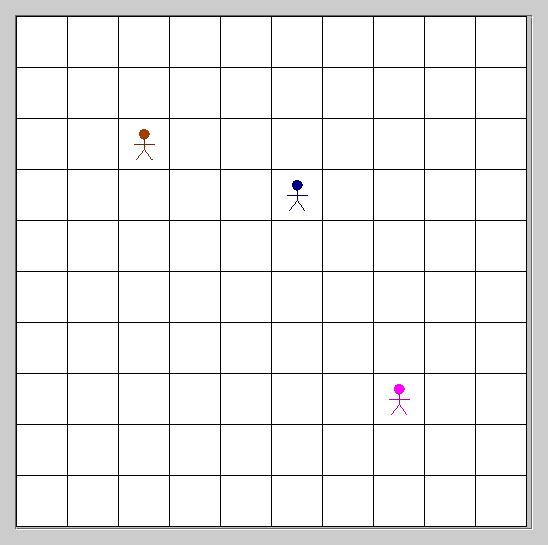 |
| Figure 1 |
The source for PersonTest can be found here: PersonTest.java