Exercise Set 4
- Complete the
colMajorFill method, using rowMajorFill
as a guide. Test your class by running the program in several environments
of various sizes and watching the traversal. Are the cells filled
in left-to-right, going down each column? (A traversal
through a two-dimensional data structure is an algorithm that steps
through all the elements of the data structure, visiting each element
exactly once. A traversal through an environment steps through
all the locations in the environment. Column-major order
means stepping through a two-dimensional data structure column-by-column.
It first visits all the locations in column 0 top-to-bottom, then
all the locations in column 1, and so on.)
- Write a
reverseRowMajorFill method, using rowMajorFill
as a guide. This algorithm should fill in cells bottom-up, going left-to-right
across each row. In other words, the row order is reversed, but the
column order is not. If your new method has the same number and type
of parameter(s) and the same return type as the rowMajorFill
method, then something magical will happen when you run the program
— a new button will appear as part of the graphical user
interface! Actually, it's not magic, it's some advanced Java
code in the EnvPlotterGUI class. Click on the button
to test your new method.
- Write a
reverseColMajorFill method, using colMajorFill
as a guide. This algorithm should fill in cells right-to-left, going
up each column from the bottom. In other words, both the row and column
orders should be the reverse of colMajorFill. Test your
new method.
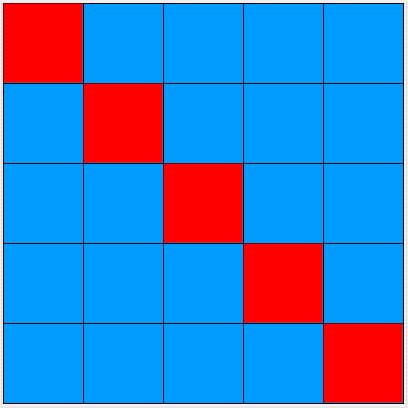
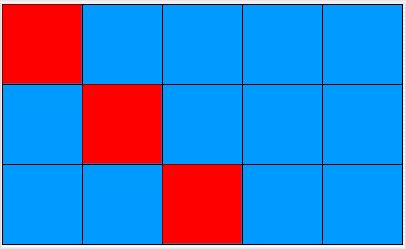
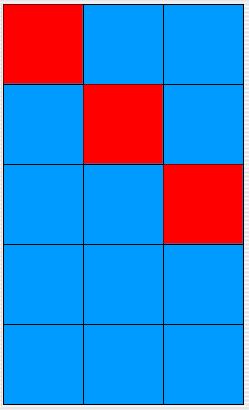
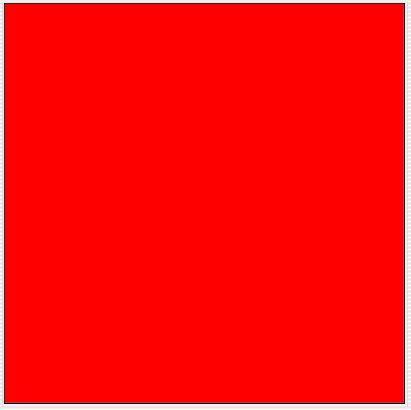
- Write a
diagonal method. This algorithm should color
cells along the diagonal from the upper-left corner towards the lower-right
corner. It will actually end up in the lower-right corner only if
the environment is square. If it is not square, the algorithm
steps down and to the right until it comes to the last column or the
last row, depending on whether the environment is higher than it is
wide or wider than it is high. The diagrams below show the behavior
for a 5 x 5 environment, a 3 x 5 environment, a 5 x 3 environment,
and a 1 x 1 environment.
Before you attempt to write the code, list the locations that you
want to fill. When you're done with the implementation, test your
new method in various sized environments, such as the ones above.
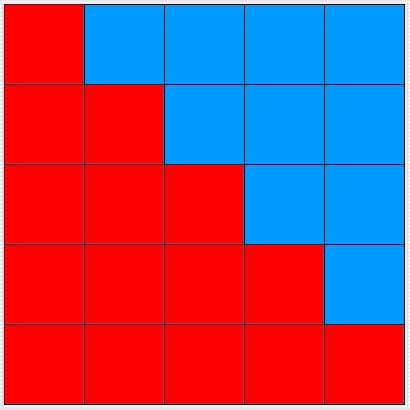
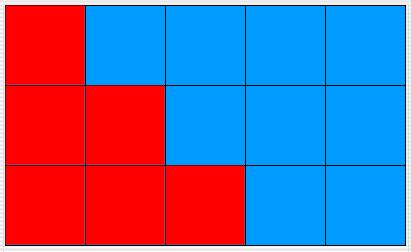
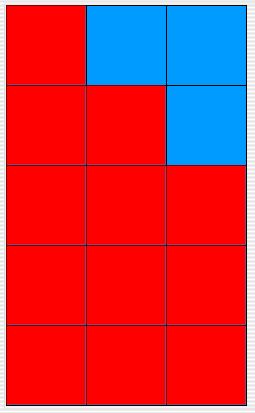
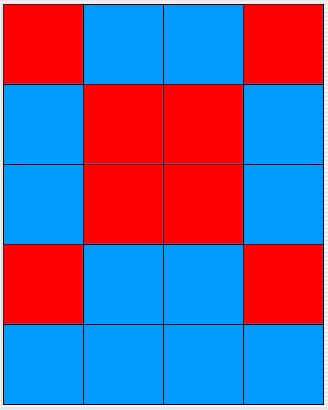
- Write a
triangle method. This algorithm should fill
in all the cells on and below the diagonal you produced in the preceding
exercise. (It will form a true triangle only if there are at least
as many columns in the environment as there are rows.) Before
you attempt to write the code, list the locations that you want to
fill. When you're done with the implementation, test your new class.
The diagrams below show the behavior for a 5 x 5 environment, a 3
x 5 environment, a 5 x 3 environment, and a 1 x 1 environment.
- Write a second diagonal method similar to the first one, but going
from the upper-right corner towards the lower-left corner. (Again,
whether it actually reaches the lower-left corner depends on whether
or not the environment is square.) Give your method an appropriate
name and test it in a variety of environments.
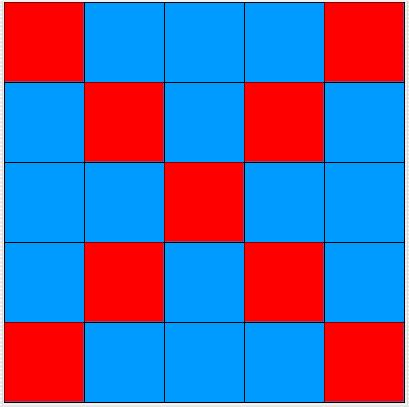
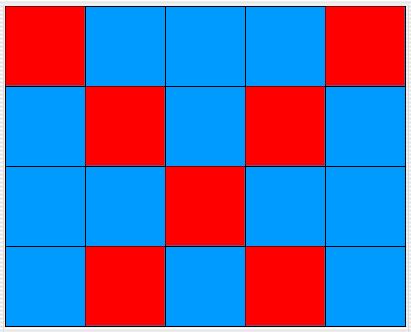
- Write a method that draws an 'X' in the environment, giving it an
appropriate name. Reuse existing methods as appropriate. When
you're done, test your new method. The diagrams below show the behavior
for a 5 x 5 environment, a 4 x 5 environment, a 5 x 4 environment,
and a 1 x 1 environment.
Hint: The best implementation of this method consists of two
statements, with no loops.
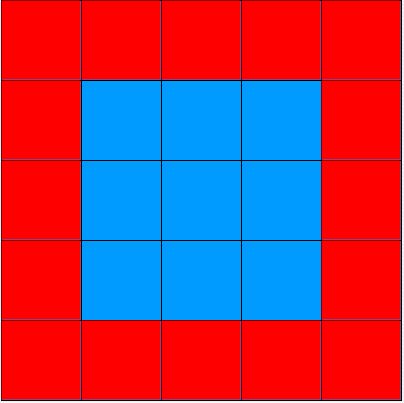
- Write a method that draws a border around the environment's perimeter.
Before you attempt to write the code, list the locations that you
want color in order to find a pattern. When you're done with the implementation,
test your new method. The diagrams below show the behavior for
a 5 x 5 environment, a 2 x 5 environment, a 3 x 1 environment, and
a 1 x 1 environment.
- Write three (or more) new methods that you could use to draw a picture.
For example, you could create a method that draws the walls of a house,
a method that draws a roof, and a method that draws four windows.
A user could then use your methods to draw black walls, a red roof,
and blue windows. Your picture should draw in environments of
different sizes, scaling up or down as necessary. You may, however,
specify a minimum size if you want; for example, this picture will
only draw correctly in an environment that has at least 20 rows and
at least 20 columns. You may also want to specify that the environment
has to be square, or that the number of columns must be twice as many
as the number of rows. Whatever your constraints are, be sure
to document them for the appropriate methods in the
EnvPlotter
class!
|